cleaning battery corrosion on toys
I once opened a talking toy after it went mysteriously silent and found the batteries welded in place under a crust of white residue. My first mistake was wiping at it with a wet paper towel. That spread the mess into the corners and made the battery compartment harder to dry.
Cleaning battery corrosion on toys is usually possible when the damage is limited to an accessible compartment and the toy uses ordinary alkaline batteries. The key is using very little liquid, working slowly, and knowing when damaged metal or electronics make the toy a lost cause.
Keep children and pets away while you work. Battery residue, loose pieces, and cleaning supplies do not belong in curious hands (especially when the toy already looks interesting because it is in pieces).
⚡ The TidyFormula™ Quick Answer
The Fix: Remove the leaking alkaline batteries, dab the terminals with a small amount of white vinegar, lift away the loosened residue, and let the compartment dry completely before testing the toy with fresh batteries.
Tools and Preparation
This method is intended for common alkaline AA, AAA, C, D, or 9-volt batteries. Check the battery label before starting. If you see a swollen lithium battery, a damaged rechargeable pack, smoke, heat, or wet leakage, stop using the toy and follow the manufacturer’s disposal instructions.
What I Use For This Job
Using the right tools saves time and protects your belongings. Here are my exact recommendations:
*As an Amazon Associate, TidyFormula earns from qualifying purchases.
Gather these supplies:
- Disposable gloves, preferably nitrile gloves
- Safety glasses
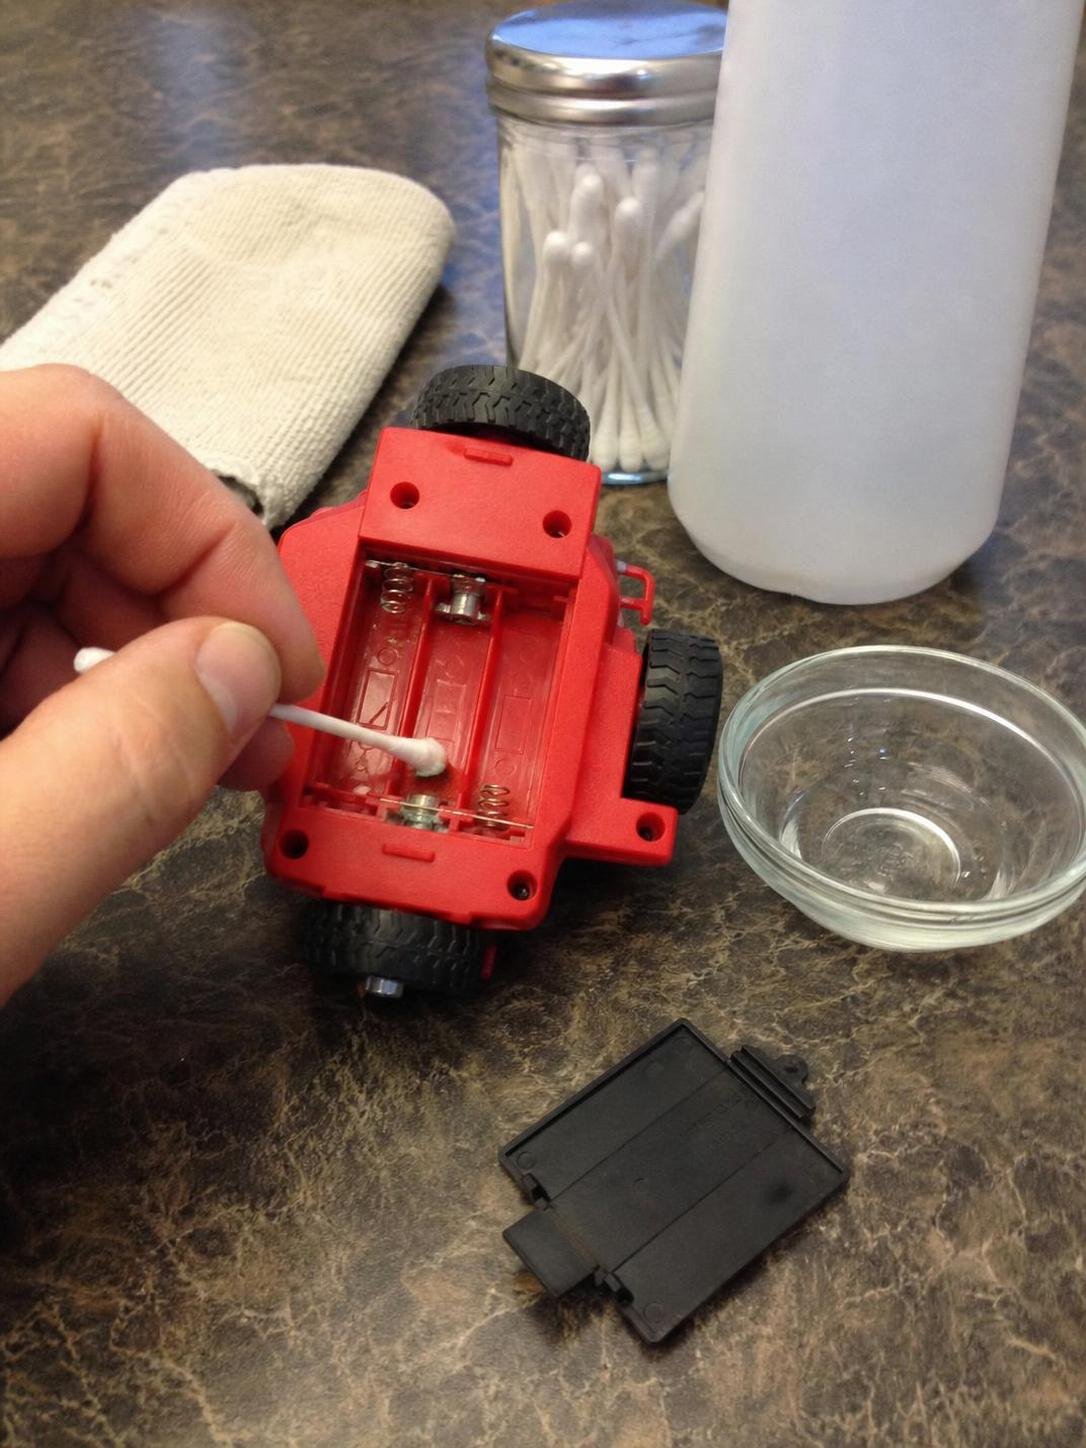
- Several cotton swabs
- Plain white vinegar
- A wooden toothpick or plastic detailing tool
- Dry paper towels or a lint-free cloth
- A small cup for dispensing vinegar
- Optional 70% isopropyl alcohol for a final moisture-displacing wipe
- Fresh batteries for testing
Work on a stable surface with good ventilation. Place the toy on an old towel or a disposable layer, keeping its battery compartment facing upward. If possible, photograph the battery orientation before removing anything.
I like pointed cotton swabs because they reach around springs without flooding the compartment. Pouring directly from the vinegar bottle is too difficult to control and is one of the quickest ways to send liquid deeper into the toy.
What not to use
- Do not soak or rinse the compartment. Water can carry residue into switches, speakers, and circuit boards.
- Do not use bleach, ammonia, or mixed cleaners. They are unnecessary and can damage finishes and metal parts.
- Do not attack the contacts with steel wool. Loose metal fibers may remain behind and cause an electrical short.
- Do not blow into the compartment. This can scatter dry residue toward your face or farther inside the toy.
- Do not pry aggressively at a stuck battery. Crushing or puncturing it creates a larger cleanup problem.
How to Clean Toys With Corroded Batteries
Before beginning, turn the toy off and disconnect any power cord. This approach to cleaning corroded battery terminals on toys uses only enough cleaner to dampen the residue—not enough to drip.
1. Inspect the toy before touching the batteries
- Open the battery door and identify the battery type printed on the label.
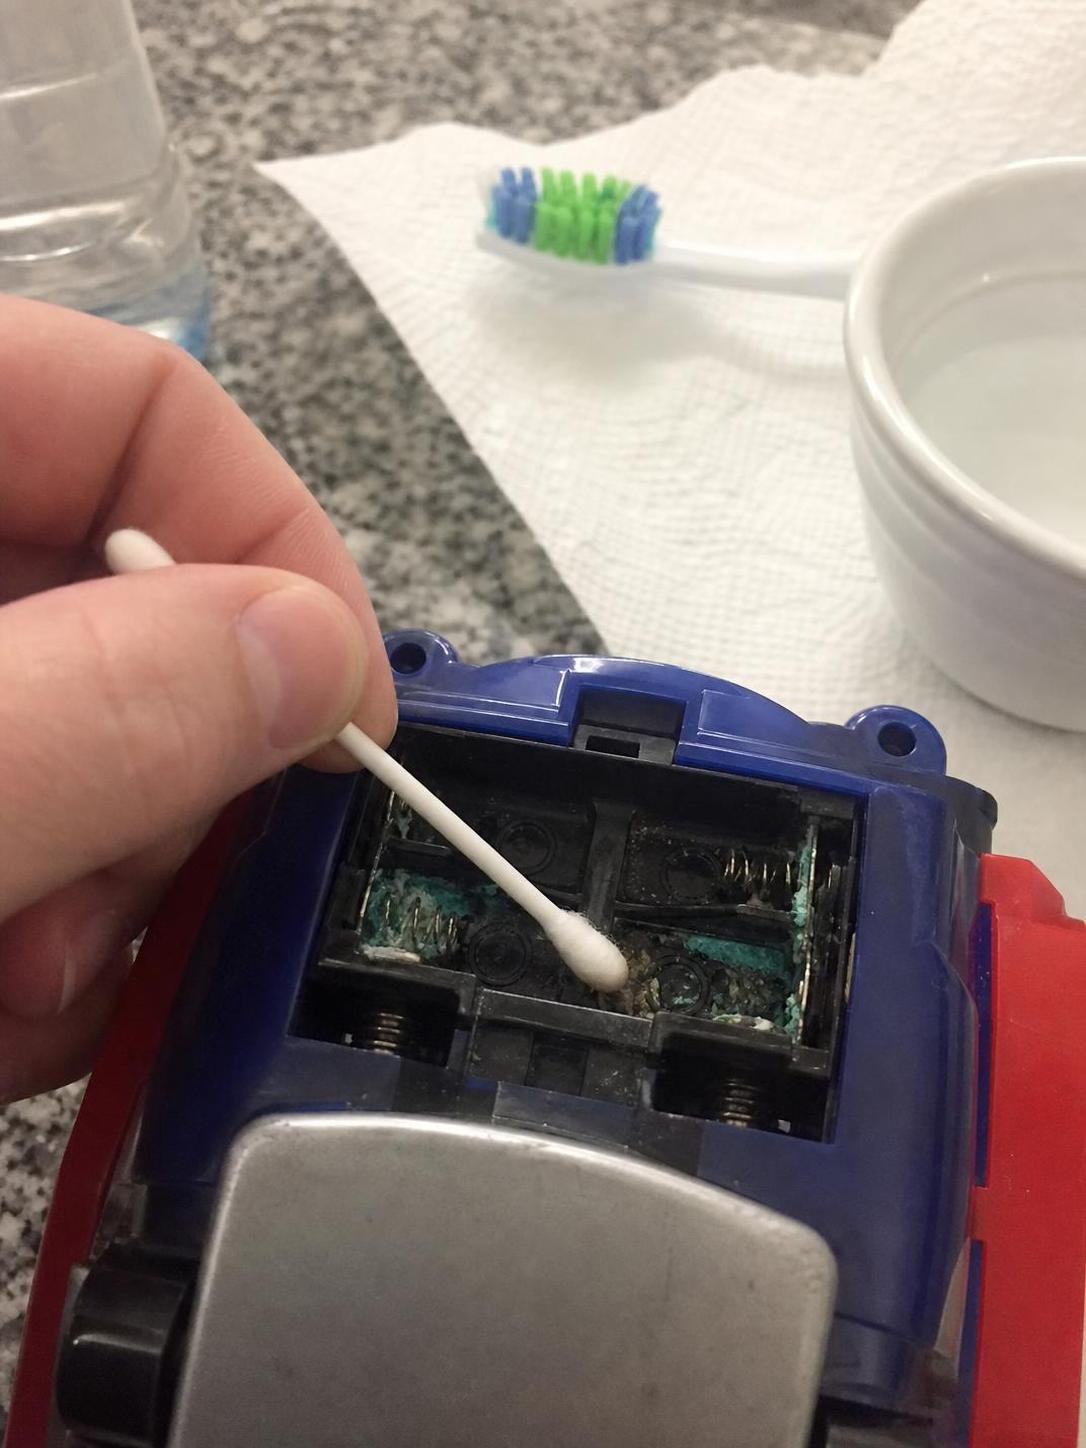
- Look for white crust, chalky powder, green staining, rust, split batteries, or deformed terminals.
- Check whether residue has traveled through openings into the toy’s internal electronics.
- Stop if the compartment is melted, the wiring is exposed, or a rechargeable or lithium battery is swollen or hot.
Ordinary alkaline cells commonly leave a white or gray deposit. That visible material is associated with alkaline battery leakage, and it should not be handled with bare hands.
2. Remove the old batteries carefully
- Put on gloves and safety glasses.
- Tilt the compartment away from your face.
- Lift out loose batteries without squeezing them.
- If a battery is lightly stuck, wiggle it gently from the end that is not trapped beneath a spring.
- Place removed batteries in a disposable nonmetal container and wash your gloved hands before continuing.
If the battery will not move with gentle pressure, stop. Hard prying can tear the battery casing or pull a terminal away from its wire. A toy repair shop may be a better option for a valuable or sentimental item.
Do not put visibly leaking batteries back into household storage. The EPA guidance for used household batteries explains disposal and recycling considerations, though local collection rules should also be checked.
3. Remove loose residue without spreading it
- Keep the compartment facing upward.
- Use the corner of a dry paper towel to lift loose material.
- Work a wooden toothpick around terminal edges if crust is packed into a corner.
- Fold the used paper towel inward and discard it so residue does not transfer back to the toy.
Use gentle pressure. If a spring starts bending or a terminal flakes apart, stop scraping. The contact may already be too weakened to provide reliable power.
4. Dab alkaline residue with vinegar
- Pour a teaspoon of vinegar into a separate cup.
- Dip in a cotton swab, then press it against a paper towel so it is damp rather than dripping.
- Dab the affected metal and visible crust. A little fizzing may occur.
- Wait 30 to 60 seconds, then lift away the softened deposit with a clean swab.
- Repeat with fresh swabs until they stop collecting visible residue.
For most ordinary alkaline leaks, this is the best way to clean toy battery terminals because the mild acid helps loosen and neutralize the alkaline deposit. More vinegar is not better. If liquid pools in the compartment or runs toward a seam, blot it immediately and turn the toy so it cannot travel farther inside.
5. Detail the contacts
- Use a toothpick wrapped in a thin piece of paper towel to clean around springs and flat contacts.
- For stubborn material, repeat the damp-vinegar treatment instead of scraping harder.
- Wipe each contact with a fresh swab lightly dampened with isopropyl alcohol.
- Finish with a dry swab or lint-free cloth.
The alcohol step is optional, but I find it useful for collecting the final film and helping small amounts of moisture evaporate. Never pour it into the compartment, and keep it away from flames or heat.
6. Decide whether the terminals are usable
- Check that springs still compress and return to their original position.
- Look for clean metal where each battery end must make contact.
- Confirm that the terminals are firmly attached rather than loose or crumbling.
- Do not test the toy if the contacts are broken, badly thinned, or detached from their wiring.
Dark discoloration alone does not always prevent a toy from working. A missing section of contact metal does. Replacement terminals are possible on some toys, but that becomes an electrical repair rather than a basic cleaning job.
🧪 Why This Works
Alkaline battery residue is basic, while vinegar is mildly acidic. Dabbing vinegar onto the deposit is a bit like loosening mineral scale around a faucet: brief contact softens the crust so it can be lifted away. The goal is controlled contact, not soaking. A final light alcohol wipe helps collect leftover film and evaporates more readily than water.
Choosing the Right Cleaning Approach
| Method | Best use | Main caution |
|---|---|---|
| Dry paper towel or wooden toothpick | Removing loose crust before using liquid | Do not scatter powder or bend terminals |
| Damp vinegar swab | Loosening residue from ordinary alkaline batteries | Use drops, not a pour; confirm the battery type first |
| Light alcohol wipe | Collecting final film and aiding evaporation | Keep away from heat and do not saturate electronics |
| Water rinse | Not recommended inside an electronic toy | May carry contamination and moisture into internal parts |
| Steel wool or aggressive sanding | Not recommended for routine toy cleanup | Can remove plating and leave conductive fibers behind |
Common Mistakes That Make the Job Harder
Using too much vinegar
The swab should be damp enough to treat the residue without releasing a drop when pressed. Flooding the compartment may move contamination into the speaker, motor, or circuit board. I learned this after over-wetting a musical toy and spending far longer drying it than cleaning it.
Installing new batteries immediately
A compartment can look dry while moisture remains beneath a spring or around a screw. Powering the toy too soon may cause unreliable operation or additional corrosion.
Scraping until every stain disappears
Clean contact points matter more than perfect appearance. Aggressive scraping removes the thin protective plating from terminals, exposing metal that may corrode more easily later.
Cleaning the whole toy in water
A washable plastic surface does not make the electronic body washable. After the battery compartment is secured and fully dry, clean the exterior separately with a barely damp cloth. For non-electronic water toys, our guide to getting bath toys clean covers a different, water-friendly process.
Ignoring residue outside the compartment
Inspect the battery door, nearby seams, and the surface where the toy was stored. Wipe the work area after cleanup so dried particles are not transferred to hands or other belongings.
Drying, Reassembly, and Storage
Leave the battery door open and place the toy in a dry, ventilated spot for at least several hours. If the compartment was accidentally over-wet or has deep spring pockets, allow it to dry overnight. Avoid hair dryers, ovens, radiators, and direct high heat, which can warp plastic.
Before installing batteries, check for a vinegar smell, dampness, loose particles, and white residue returning around the contacts. The compartment needs complete air drying. If anything still looks wet, wait longer.
Install a full matching set of fresh batteries in the correct orientation. Do not combine old and new cells or mix battery brands and chemistries. Turn the toy on briefly and watch for flickering, intermittent sound, unusual warmth, or a burning smell. Switch it off and remove the batteries if anything seems wrong.
If the toy is plush with a removable electronic battery unit, clean the unit separately and keep the fabric dry during the corrosion treatment. Our method for cleaning plush toys without a washing machine can help with the fabric after the power component is removed or safely isolated.
For toys used occasionally, remove the batteries before long-term storage. Store them separately in their original packaging or a battery organizer, away from heat and damp conditions. Check battery-operated holiday toys, decorations, and learning devices every few months rather than discovering leakage a year later.
A Practical Pro Tip
After the compartment is dry, shine a flashlight across the terminals from the side rather than straight down. Low-angle light makes leftover crust stand out around spring coils and under contact tabs. In my testing, this catches residue that looks invisible under ordinary room lighting.
Frequently Asked Questions
Can a toy still work after battery corrosion?
Yes, if the leakage stayed inside the compartment and the terminals remain solid and conductive. A toy may not be repairable through cleaning alone if wires, circuit boards, or large sections of the contacts have corroded.
Is vinegar always safe for cleaning corroded battery terminals on toys?
No. Vinegar is appropriate for small deposits from common alkaline household batteries when used sparingly. Do not use this method automatically on lithium cells, rechargeable packs, button batteries, or an unidentified battery leak.
Can I use baking soda instead of vinegar?
Not for typical alkaline battery residue. Baking soda is also alkaline, so it is not the logical choice for neutralizing an alkaline leak. It may also leave gritty powder inside the compartment.
How long should the battery compartment dry?
Allow several hours under dry, ventilated conditions, or overnight if cleaner reached beneath springs or into tight corners. There should be no dampness or cleaning odor before fresh batteries are installed.
How do I know when cleaning is not enough?
Stop if the battery is swollen or hot, the compartment is melted, wires are exposed, terminals crumble, or leakage has reached internal electronics. For a valuable toy, ask a qualified repair technician to assess it rather than repeatedly testing it with new batteries.
Knowing how to clean toys with battery corrosion comes down to restraint: identify the battery, remove loose residue, use a barely damp vinegar swab on ordinary alkaline deposits, and give the compartment plenty of drying time. The final reminder is simple—remove batteries from toys headed into storage, because prevention is far less frustrating than rebuilding a corroded spring contact.
Everything Mentioned Above
Before you leave, grab the tools you need to get the job done right the first time:
*As an Amazon Associate, TidyFormula earns from qualifying purchases.