How to Remove Black Marks from Vinyl Flooring
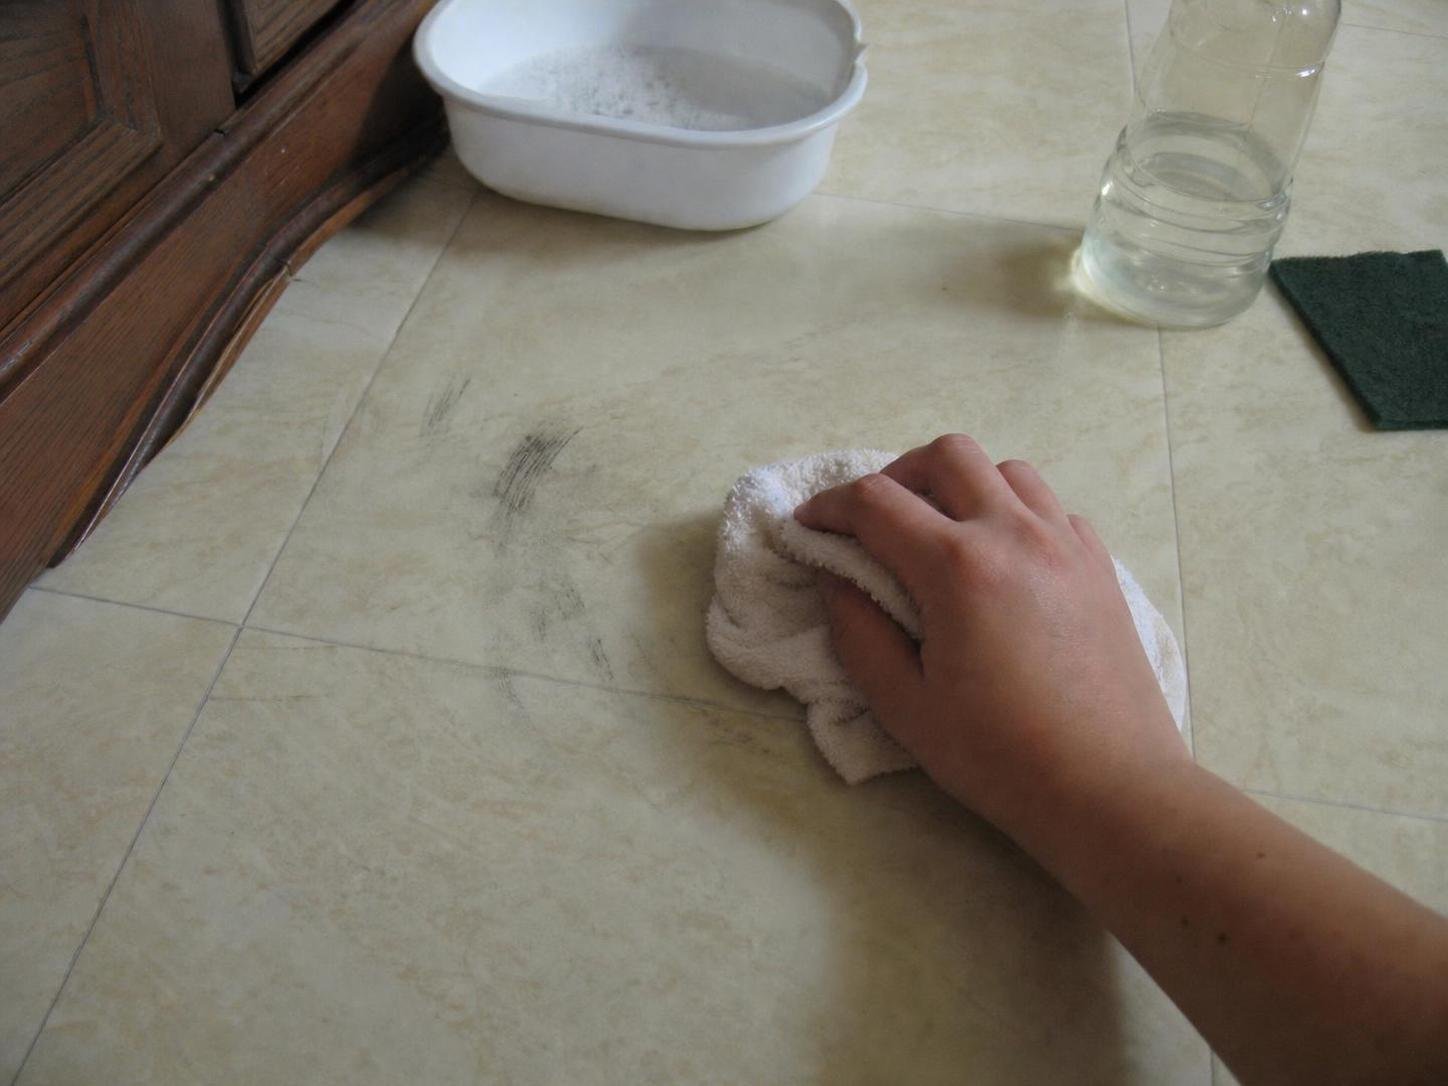
To remove black marks from vinyl flooring, start with a damp microfiber cloth and a vinyl-approved pH-neutral cleaner. For stubborn rubber scuffs, gently use a clean white eraser, then wipe away residue. Test first, keep water out of plank seams, and avoid solvents or aggressive scrubbing that can dull or soften the wear layer.
Most removable black marks come from shoe soles, furniture feet, carts, or rubber wheels. Dark discoloration beneath the finish, however, may be a stain or material reaction that surface cleaning cannot correct.
⚡ The TidyFormula™ Quick Decision
Best approach: Use a barely damp microfiber cloth with a vinyl-approved pH-neutral cleaner, followed by a clean white eraser for remaining scuff transfer.
Use caution with: Textured finishes, luxury vinyl plank seams, older flooring, and any product or scrubber that could abrade the clear wear layer.
Check Whether the Mark Is Transfer or Floor Damage
A surface scuff usually changes when rubbed with a damp cloth. A scratch, gouge, burn, or discoloration beneath the wear layer will remain unchanged and may need repair rather than more cleaning.
What I Use For This Job
Using the right tools saves time and protects your belongings. Here are my exact recommendations:
*As an Amazon Associate, TidyFormula earns from qualifying purchases.
- Rubber transfer: Often looks streaky or slightly raised and may begin lifting with gentle wiping.
- Embedded dirt: Common in textured vinyl and usually follows the floor’s low spots or grain.
- Scratch or gouge: Has a visible edge or catches a fingernail. Cleaning will not restore missing material.
- Mat or adhesive discoloration: Appears beneath the surface and does not transfer to your cloth.
- Finish damage: Looks dull, cloudy, or lighter than the surrounding flooring rather than sitting on top of it.
Check the flooring manufacturer’s care instructions before using a specialty cleaner. If you do not know the brand or finish, test your cleaner and eraser in a hidden corner first.
Gather a Small, Low-Risk Cleaning Kit
You need only a few supplies. Starting with the least aggressive option lowers the chance of turning a removable scuff into a permanently dull patch.
- A vacuum with a hard-floor setting or a soft broom
- Two clean microfiber cloths
- A pH-neutral cleaner labeled for vinyl flooring
- A plain white, non-colored eraser
- Clean water
- A soft-bristled brush for textured flooring, if needed
Avoid colored erasers because their dyes can transfer. Also skip steel wool, scouring pads, stiff brushes, and gritty cleaning powders.
The Safest Step-by-Step Method
Work from gentle wiping to limited friction. Stop as soon as the mark disappears; extra scrubbing does not make the area cleaner and can change the floor’s sheen.
- Remove loose grit. Vacuum or sweep around the mark before rubbing it. Sand and hard debris can scratch the wear layer when trapped beneath a cloth.
- Test the cleaner. Apply the vinyl-approved cleaner according to its current label directions in an inconspicuous area. Stop if the finish becomes cloudy, tacky, lighter, or darker.
- Wipe with minimal moisture. Dampen a microfiber cloth and wring it thoroughly. Apply the cleaner as its label directs, then wipe the black mark with light pressure. On vinyl planks or tiles, do not allow liquid to collect along seams or edges.
- Repeat with a clean section of cloth. Turn the cloth as black residue transfers. Reusing a dirty section can spread the mark into a gray smear.
- Use a white eraser on remaining scuff transfer. Rub lightly in short passes without bearing down. Check the area often and stop if the surface begins looking dull or the eraser affects the floor’s texture.
- Brush textured vinyl carefully. If residue remains in embossed grooves, use a soft brush with the approved cleaner. Follow the texture rather than scrubbing aggressively across it.
- Remove cleaner and eraser residue. Wipe the area with a second microfiber cloth dampened with clean water. Keep the cloth well wrung out, especially near seams.
- Dry the floor. Wipe with a dry cloth and leave the area uncovered until no moisture remains around plank joints, tile edges, or baseboards.

🧪 Why This Works
A damp microfiber cloth collects loose soil without relying on heavy abrasion. A vinyl-compatible cleaner helps release oily dirt, while the white eraser provides controlled friction for rubber transfer. Removing the remaining cleaner and eraser crumbs prevents a cloudy film from being mistaken for permanent damage.
What to Do If the Mark Remains
A failed first attempt does not automatically mean you need a stronger chemical. Recheck what the mark is and adjust the method without increasing pressure too quickly.
The mark faded but left a gray smear
Use a clean section of damp microfiber rather than continuing with the soiled cloth. Follow with a water-dampened cloth to remove any cleaner film, then dry the floor.
Black residue is trapped in the floor texture
Apply the vinyl-approved cleaner as directed and use a soft-bristled brush only in the recessed texture. If the raised portions begin losing their sheen, stop scrubbing.
The area feels sticky
Sticky flooring usually indicates cleaner residue or use of an unsuitable product. Wipe several times with a clean, well-wrung cloth and plain water. If tackiness remains, consult the flooring manufacturer before applying another cleaner.
The mark does not change at all
Inspect it under good light. A gouge, burn, worn finish, or discoloration caused by a rubber-backed mat may extend below the cleanable surface. Repeated scrubbing will not lift this type of damage and may make it more visible. Consider a manufacturer-approved repair product or professional flooring assessment.
The cleaned spot looks dull
Stop using erasers and abrasive tools. Remove any residue gently, let the floor dry, and compare the spot with the surrounding area. If the dull patch remains, the wear layer may have been abraded. Do not apply wax or polish unless the flooring manufacturer specifically approves it.
Cleaning Mistakes That Can Damage Vinyl
The most common mistake is treating a rubber scuff like a stain that requires a powerful solvent. Vinyl’s clear wear layer can be affected before the black mark disappears.
- Do not use acetone, nail polish remover, paint thinner, or an unapproved adhesive remover. Strong solvents may soften, discolor, or dull vinyl.
- Do not scrub with steel wool or abrasive powder. These can permanently change the finish.
- Do not rely on a melamine foam eraser as the first choice. It cleans through mild abrasion and may leave a dull spot, especially on glossy or dark flooring. Use it only if the flooring manufacturer allows it.
- Do not flood the floor. Excess liquid can enter seams, edges, or damaged areas and may affect adhesive or the material beneath the vinyl.
- Do not steam-clean unless expressly permitted. Heat and moisture may be unsuitable for some vinyl flooring systems.
- Do not mix cleaning products. Use one product at a time and follow its current label directions.
Prevent New Black Marks
Preventing repeated rubber transfer is easier than repeatedly scrubbing the same section of floor. Focus on the object making contact with the vinyl.
- Clean grit from shoe soles before walking across the floor.
- Add vinyl-compatible felt or smooth protective pads beneath furniture feet.
- Inspect chair casters, appliance wheels, and carts for dark rubber transfer.
- Lift heavy furniture instead of dragging it.
- Check that mats and rug pads are labeled as compatible with vinyl flooring. Some rubber or latex backings can leave discoloration that ordinary cleaning will not remove.
- Sweep or vacuum regularly so grit does not turn a simple scuff into a scratch.
If you place a rug over the cleaned area, make sure the floor is fully dry first. For separate care instructions, see how to clean a rug without a carpet cleaner while controlling excess moisture.
Frequently Asked Questions
Can baking soda remove black marks from vinyl?
Baking soda is mildly abrasive, so it is not the preferred first method. It can leave a hazy or dull patch on some finishes. Use a vinyl-approved cleaner and a white eraser first, and consult the flooring manufacturer before trying an abrasive paste.
Can vinegar be used on vinyl flooring?
Compatibility varies by flooring and finish. Do not assume a homemade vinegar solution is approved for your floor. Follow the manufacturer’s care instructions or choose a pH-neutral cleaner specifically labeled for vinyl.
Why do black marks keep coming back?
The source may still be rubbing against the floor. Check shoe soles, chair feet, wheels, furniture glides, and rug backings. A recurring dark line can also be a scratch collecting dirt rather than fresh rubber transfer.
Should a damaged plank be replaced?
Replacement may be more practical when a plank is deeply gouged, burned, permanently discolored, lifting at the edge, or damaged through its wear layer. Check whether the flooring system allows individual plank replacement and follow the manufacturer’s repair instructions.
The best way to remove black marks from vinyl flooring is to use minimal moisture, a vinyl-approved cleaner, and only enough friction to lift the transfer. Stop if the finish changes, remove all residue, dry the seams, and address the shoe, wheel, furniture foot, or mat causing the mark.
Everything Mentioned Above
Before you leave, grab the tools you need to get the job done right the first time:
*As an Amazon Associate, TidyFormula earns from qualifying purchases.