Fridge Organization and Cleaning Checklist
A practical fridge organization and cleaning checklist starts with removing expired or questionable food, cleaning spills with warm water and a small amount of dish soap, drying every surface, then grouping food by type. Keep raw meat in a leakproof container on the lowest suitable shelf, and follow your refrigerator’s care instructions for removable parts and finishes.
The main challenge is keeping perishable food protected while you work. Gather supplies first, clean one section at a time for routine upkeep, and use a cooler or another suitable cold-storage option when the refrigerator must be emptied for a deeper cleaning.
⚡ The TidyFormula™ Quick Decision
Best approach: Empty, wash, dry, and reorganize one zone at a time unless the entire refrigerator needs a deeper cleaning.
Use caution with: Glass shelves, electronic controls, vents, door gaskets, and removable parts that may not be dishwasher-safe.
Replace instead of cleaning if: A shelf, bin, or gasket is cracked, sharp, badly warped, or unable to seal correctly.
What I Use For This Job
Using the right tools saves time and protects your belongings. Here are my exact recommendations:
*As an Amazon Associate, TidyFormula earns from qualifying purchases.

Check the Refrigerator Before You Start
Inspect the interior before applying cleaner or removing parts. Your refrigerator manual takes priority because shelf materials, surface coatings, drainage systems, and removable components vary by model.
- Look for cracked glass, sharp plastic edges, loose trim, and damaged door gaskets.
- Identify control panels, lights, vents, sensors, and other areas that shouldn’t be sprayed or saturated.
- Check whether shelves, bins, and drawers are approved for dishwasher cleaning. Don’t assume they are.
- Notice whether a glass shelf is still cold. A sudden temperature change may damage some glass components.
- Check for spills that have reached seams, drawer tracks, or the bottom of the refrigerator.
Stop if you find cracked glass or a damaged electrical component. Follow the manufacturer’s instructions or arrange appropriate service rather than attempting to clean around a potentially unsafe part.
Cleaning Supplies to Gather
A short cleaning supplies checklist prevents food from sitting out while you search for tools. Mild products and low moisture are usually the best starting point.
- A cooler or another suitable place for temporarily holding perishable food
- Trash and recycling bags
- Clean microfiber cloths or soft, nonabrasive sponges
- Warm water
- A small amount of mild dish soap
- A soft brush for gasket folds and drawer tracks
- A plastic scraper for residue that won’t release with a cloth
- Clean towels for drying shelves, bins, and interior surfaces
- Labels and a marker for dating leftovers or identifying bins
Avoid abrasive pads, metal scrapers, and harsh cleaning products unless the appliance manufacturer specifically permits them. Never mix household cleaning products. If you use a packaged cleaner, confirm that it’s suitable for the surface and follow its current label directions.
How to Clean and Organize Your Fridge
The preferred method is to work from top to bottom, use as little moisture as practical, and dry each component before reassembly. Keep the refrigerator door closed whenever you pause to protect the remaining food.
- Prepare the food-storage area. Set up a cooler or another suitable cold-storage option before emptying the refrigerator. If your manual directs you to switch off or unplug the appliance for cleaning, follow those instructions and handle the plug only with dry hands.
- Remove and sort the food. Group similar items as they come out. Discard leaking or visibly spoiled food and anything you’ve determined shouldn’t be kept. Don’t taste questionable food to decide whether it is usable.
- Remove shelves, drawers, and bins carefully. Support glass shelves with both hands. Allow cold components to adjust gradually before washing them with warmer water, and don’t put a part in the dishwasher unless the manufacturer permits it.
- Clear dry debris first. Wipe or collect crumbs before using a damp cloth. This keeps crumbs from turning into wet residue in seams and drawer tracks.
- Wash removable parts. Use warm water, mild dish soap, and a soft cloth or sponge. Avoid bending drawers or pulling on attached trim. Rinse away soap residue with a clean damp cloth if the part isn’t rinsed directly.
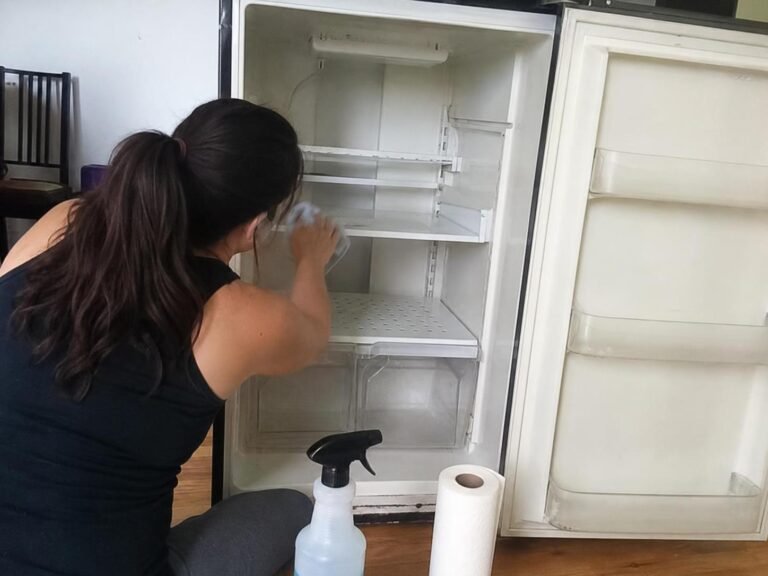
- Clean the interior from top to bottom. Wipe the ceiling, walls, shelf supports, drawer tracks, and floor with a lightly damp cloth and mild soapy water. Apply cleaner to the cloth rather than spraying controls, vents, lights, or openings.
- Loosen dried spills without scraping aggressively. Hold a damp cloth against the residue until it softens, then wipe it away. Use a plastic scraper with light pressure if needed. Stop if the surface begins to scratch, dull, discolor, or peel.
- Clean the door gasket gently. Wipe the gasket and its folds with mild soapy water, using a soft brush for trapped crumbs. Don’t pull the gasket away from the door. Follow with a clean damp cloth and dry the folds thoroughly.
- Dry and reassemble. Dry the interior, shelves, drawers, bins, tracks, and gasket before putting them back. Make sure shelves sit securely, drawers slide correctly, and the door closes without obstruction.
- Return food by category. Place raw meat in a leakproof container on the lowest suitable shelf so a leak is less likely to drip onto other food. Keep ready-to-eat foods together, use produce drawers according to your model’s settings, and avoid blocking air vents.
- Label and rotate. Date leftovers, move older usable items toward the front, and keep frequently used food easy to see. Avoid packing shelves so tightly that food hides behind other containers or restricts airflow.

🧪 Why This Works
Removing crumbs before damp cleaning prevents smeared residue, while softening dried spills reduces the need for forceful scraping. Drying components before reassembly helps prevent water marks, trapped moisture, and slippery shelves. Grouping food by type also makes spills and forgotten containers easier to notice.
Clean the Exterior According to Its Finish
Use a lightly damp cloth on handles and frequently touched exterior areas, then dry them. Keep moisture away from display panels, dispensers, seams, and openings. Painted, coated, glass, and stainless steel doors may require different products, so check the appliance instructions before applying anything stronger than mild soapy water.
For a stainless steel door that looks cloudy or streaked after cleaning, use the finish-specific steps in this guide to clean a stainless steel fridge without streaks.
A Realistic Cleaning Schedule
Clean spills promptly, review food weekly, and schedule a deeper cleaning when residue, odors, crowding, or dirty removable parts make it necessary. A fixed calendar matters less than responding before buildup becomes difficult to remove.
| Timing | Checklist |
|---|---|
| As needed | Wipe fresh spills, dry wet containers, remove leaking packages, and check that the door closes fully. |
| Weekly | Review leftovers, discard unwanted food, wipe handles, rotate older items forward, and check the raw-meat tray for leaks. |
| Periodically | Clean one shelf or drawer at a time, wipe gasket folds, and remove crumbs from tracks and corners. |
| Deeper cleaning | Empty the refrigerator, wash removable parts, clean all interior surfaces, dry thoroughly, and reset the organization system. |
To coordinate refrigerator upkeep with the rest of your home, add these tasks to a broader household cleaning checklist.
Organization Rules That Prevent Repeat Clutter
A useful system should make food visible and easy to return. Bins can help, but too many bins may waste shelf space or hide spills.
- Assign broad zones. Use practical groups such as breakfast items, snacks, meal ingredients, leftovers, drinks, and condiments.
- Contain likely leaks. Use a washable tray or leakproof container for raw meat and packages that tend to drip.
- Keep labels visible. Turn containers so names and dates face forward.
- Leave room around vents. Follow your refrigerator manual for placement and clearance because vent locations vary.
- Use the door selectively. Store items there only when suitable for your refrigerator’s layout and the food’s storage instructions.
- Don’t overbuy organizers. Start with containers you already own and add purpose-specific bins only after you know which zones need them.
Fix Common Cleaning and Organization Problems
Sticky residue remains after wiping
Soap, syrup, or softened food may leave a film. Wipe the area again with a clean cloth dampened with plain water, then dry it. If residue remains, repeat the mild soapy-water step rather than reaching immediately for an abrasive pad.
The fridge smells unpleasant after cleaning
Check for a hidden source behind drawers, under bins, in gasket folds, or inside a leaking package. Wash the affected washable surface and dry it. If the odor persists, consult the manual for accessible drain or drip-pan maintenance; don’t dismantle appliance components that aren’t intended for household access.
Plastic looks cloudy, scratched, or discolored
Stop using the current product or tool. Remove remaining cleaner with a clean damp cloth and dry the surface. Scratches and chemical discoloration may not be reversible, so switch to a softer cloth and a manufacturer-approved cleaning method.
Drawers stick after reassembly
Remove the drawer and check for crumbs, moisture, misaligned tracks, or a shelf installed in the wrong position. Don’t force the drawer. Reinstall it according to the refrigerator instructions and confirm that it moves freely before filling it.
Condensation or frost keeps returning
Cleaning alone may not solve this problem. Check whether food is blocking a vent, the door is obstructed, or the gasket is dirty or visibly damaged. If the issue continues, follow the troubleshooting instructions for your model or seek appropriate appliance service.
Final Reassembly and Maintenance Check
Before considering the job finished, confirm that every component is dry and secure. Check that no cloth, label, container, or oversized package prevents the door from closing.
- Make sure shelves are fully seated and don’t wobble.
- Confirm that bins and drawers slide without scraping or binding.
- Dry gasket folds and check that the gasket lies flat.
- Keep packages away from vents, controls, and interior lights.
- Return temperature controls to their previous manufacturer-recommended settings if they were changed.
- Dispose of dirty cleaning water and wash reusable cloths separately as appropriate for their care instructions.
If fridge upkeep tends to get postponed, assign the weekly review and spill check within a recurring cleaning chores checklist.
The most reliable routine is simple: handle spills promptly, review food weekly, and deep-clean with mild soap, low moisture, and careful drying when buildup appears. Follow your refrigerator’s instructions for glass, finishes, removable parts, and controls, and keep the final organization loose enough that food, leaks, and blocked vents remain easy to spot.
Everything Mentioned Above
Before you leave, grab the tools you need to get the job done right the first time:
*As an Amazon Associate, TidyFormula earns from qualifying purchases.